Contents
- Overview
- Basic Navigation
- Creating a Project
- Participant IDs
- Adding an Instrument
- Data Dictionary Maneuvers
- Identifiers
- Surveys and the Survey Queue
- Alerts and Automated Invitations
- Production Mode
- Making Changes After Launch
- Adjusting User Rights
- Connecting to Pavlovia
- File Repository
Overview
REDCap serves as the primary mechanism for questionnaire data collection, master key management, and even experimental protocol access for the NDCLab. The sections below provide useful details to help you quickly learn how to navigate this important tool. The information on this page is in no way exhaustive, and, once you have digested it, you should actively search the web for how-to resources for additional features that may be useful to your project. Of course, be very careful in the implementation of any REDCap feature, especially one that hasn’t been thoroughly vetted by the lab before, to make sure that it does not create new risks to either data security or participant confidentiality. And always (always!) test your project thoroughly, both yourself and with the assistance of another lab member to provide a fresh set of eyes.
Basic Navigation
Designer: This is where you build out and modify all the questionnaires that participants will complete.
Survey Distribution Tools: This is where you can manage e-mails that invite participants to complete specific surveys.
Records Status Dashboard: This is where you can see an overview of all participants who have answered any of the questionnaires in your project.
Alerts & Notifications: This is where you create custom e-mail messages for either participants or researchers, which are triggered when participants complete surveys or provide a specific response to a particular question.
Data Exports, Reports, and Stats: This is where you can export all participant data as a CSV file.
File Repository: This is where you can upload helpful documents that can be accessed by study RAs.
User Rights: This is where you can control who has access to the REDCap project and what actions they can do within the project.
Creating a Project
New projects are created by CCF Data Services. Ask the lab manager to request a clone (without any data!) of an appropriately similar project. Once you have access:
- make sure there is no data in the clone (CCF is very good about this, but always wise to check)
- use a data dictionary maneuever (see below) to clear out all the variables except for
record_id - carefully check the user rights
- clear out anything in the file repository
The reason that we ask for a clone and then empty it of its contents is because the default setup for “new projects” from CCF includes some settings that are not ideal for the NDCLab’s type of data collection and take longer to adjust than simply clearing out all the existing questionnaires. ![]()
Participant IDs
REDCap automatically includes the participant ID as the first variable on the first instrument inside the project. Confirm that it is using record_id as the variable name for consistency across the lab’s data monitoring processes.
The participant ID for each REDCap record will be automatically generated as each new participant is added. The lab manager will assign you a participant ID number range, such as “150000-159999.” REDCap, however, automatically starts at “1,” so you need to seed REDCap with the first participant number so that it may count upward from there:
- On the “Record Status Dashboard,” click the green “Add new record” button.
- Select the new record.
- Under “Choose action for record,” select “Rename record.”
- Input the first number in your assigned range. Click “Rename record” to complete the process.
This dummy record will ensure that the next participant ID automatically assigned by REDCap is the next number in your assigned range. Once you have that first participant, you can delete the empty dummy record (but it is not necessary to do so).
Adding an Instrument
New or revised questionnaires should be built for the labwide instruments repo (available on GitHub), then added to a specific project. This ensures consistency across all lab projects. For clarity, this means: never create a new questionnaire within an actual data collection project; instead, discuss with the lab manager and collaborate to update the instruments repository, then add the final product to your data collection project.
To upload an existing questionnaire into a new REDCap project:
- Clone the
instrumentsrepository on GitHub to your local machine. Stay on themainbranch. - On REDCap, in the Designer section, under the “Add new instrument” header, click “Upload.”
- On the popup dialogue, select the .zip file in the instruments repository for the instrument that you want to add to your REDCap project. Click “Upload instrument ZIP”.
- The instrument will appear at the bottom of your list of instruments, but you can drag it to appear anywhere in the list.
- In the dashboard, REDCap automatically changes the lab convention (“name_s1_r1_e1”) to “Name S1 R1 E1”. Just leave this as is: all exports will use the appropriate name (and you don’t want to run the risk of inserting a typo by renaming everything). However, you may need to modify the numbers if your study has multiple sessions (“S2”), multiple runs (“R2”), or uses the same questionnaire more than once within the same run (“E2”), in order to adhere to lab convention.
- If you have modified s1_r1_e1 to use a different number, all variables within the instrument must be updated to match. Use the “data dictionary maneuver” technique described below.
- In most cases, the copied instrument should already be enabled as a survey (see the section below). You can verify that the Survey Settings contain the correct text by comparing the “Survey Title” and “Survey Instructions” to the PDF in the instruments repository that includes “redcap-survey” in its name. You want to use this exact title and these exact instructions so that future lab members can be secure in the knowledge that your deployment of a given questionnaire is identical to what is in the
instrumentsrepository. In some cases, this might also contain additional information required by the FIU IRB (e.g., THQ). If the Survey Settings inside REDCap do not contain all the correct text, you will need to copy them in; pasting from a PDF doesn’t always make for pretty formatting, so it is suggested that you first paste into a text editor (like TextEdit on Mac), then copy this unformatted text and paste it into the REDCap interface. (Note: recent upgrades to the FIU REDCap deploy make it more likely for survey settings to be properly retained. If you upload a survey and find that survey settings are not retained, please notify the lab manager so that they may update the instruments repository accordingly.) - Even for instruments that imported with the proper survey settings, you may need to update the logo (see the Surveys section below) to ensure visual consistency across your project.
Using Only Part of an Instrument
Several questionnaires used by the lab are two-in-one, such as AMBIRMBI and STAI5. On occasion, you may only want to present participants with half of the dual questionnaire. Likewise, you may want to only ask questions that relate to a specific subscore/subfactor for a questionnaire that has multiple subscores.
- Load the full questionnaire as if you were using all the questions. This ensures consistency across projects.
- Use the @HIDDEN action tag to remove questions that you do not want to be visible to the participant. On a standard question, place the action tag in the “Action Tags / Field Annotation” box. On a matrix, place the action tag in the “Field Annotation” box next to the individual item within the matrix. Both of these locations correspond to the “Field Annotation” column in the Data Dictionary export (see below).
Note: You can also accomplish the same thing by deleting questions; both “hidden” questions and deleted questions will be handled in the same manner by the instruments scoring script. Hiding is generally preferred because it is easier to correct errors and/or make modifications in the future; however, hiding does not always play nicely with matrices, and you may need to delete questions to ensure that the survey displays to your participant as desired.
Adding a Screener
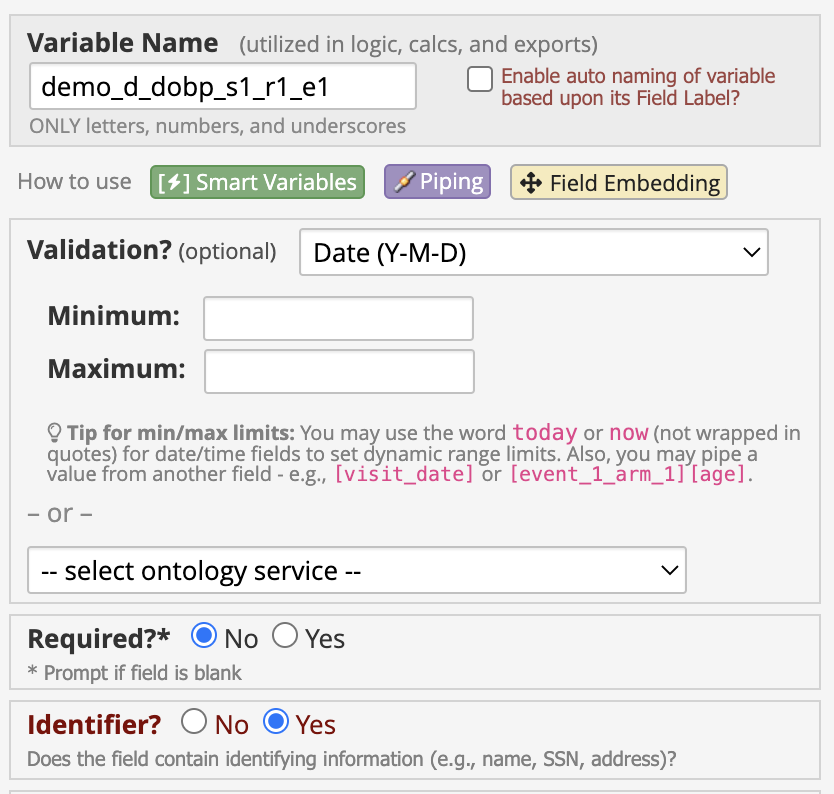
A screener enables you to confirm participant eligibility prior to consent. Create it as the first instrument in your REDCap project (so its first field will be your record_id field). The questions should all be required and must be drawn explicitly from the IRB-approved eligibility information. In addition, given that these questions are being asked prior to participant consent, mark all fields as “Identifiers” (see below) so that they will not output in any data export.
For asynchronous studies, it is recommended that you create an alert (see below) for eligible participants and an alert for ineligible participants that notifies you, by e-mail, whenever anyone completes the screener.
Adding a Consent
The lab manager will provide you with a REDCap zip of the consent that matches the IRB-approved version. Upload this directly to REDCap just as you would any other instrument.
Then set up the e-Consent Framework for traceability on consents. Inside the Survey Settings, simply turn on “Auto-Archiver + e-Consent Framework.” Specify the e-Consent version indicated by the lab manager:
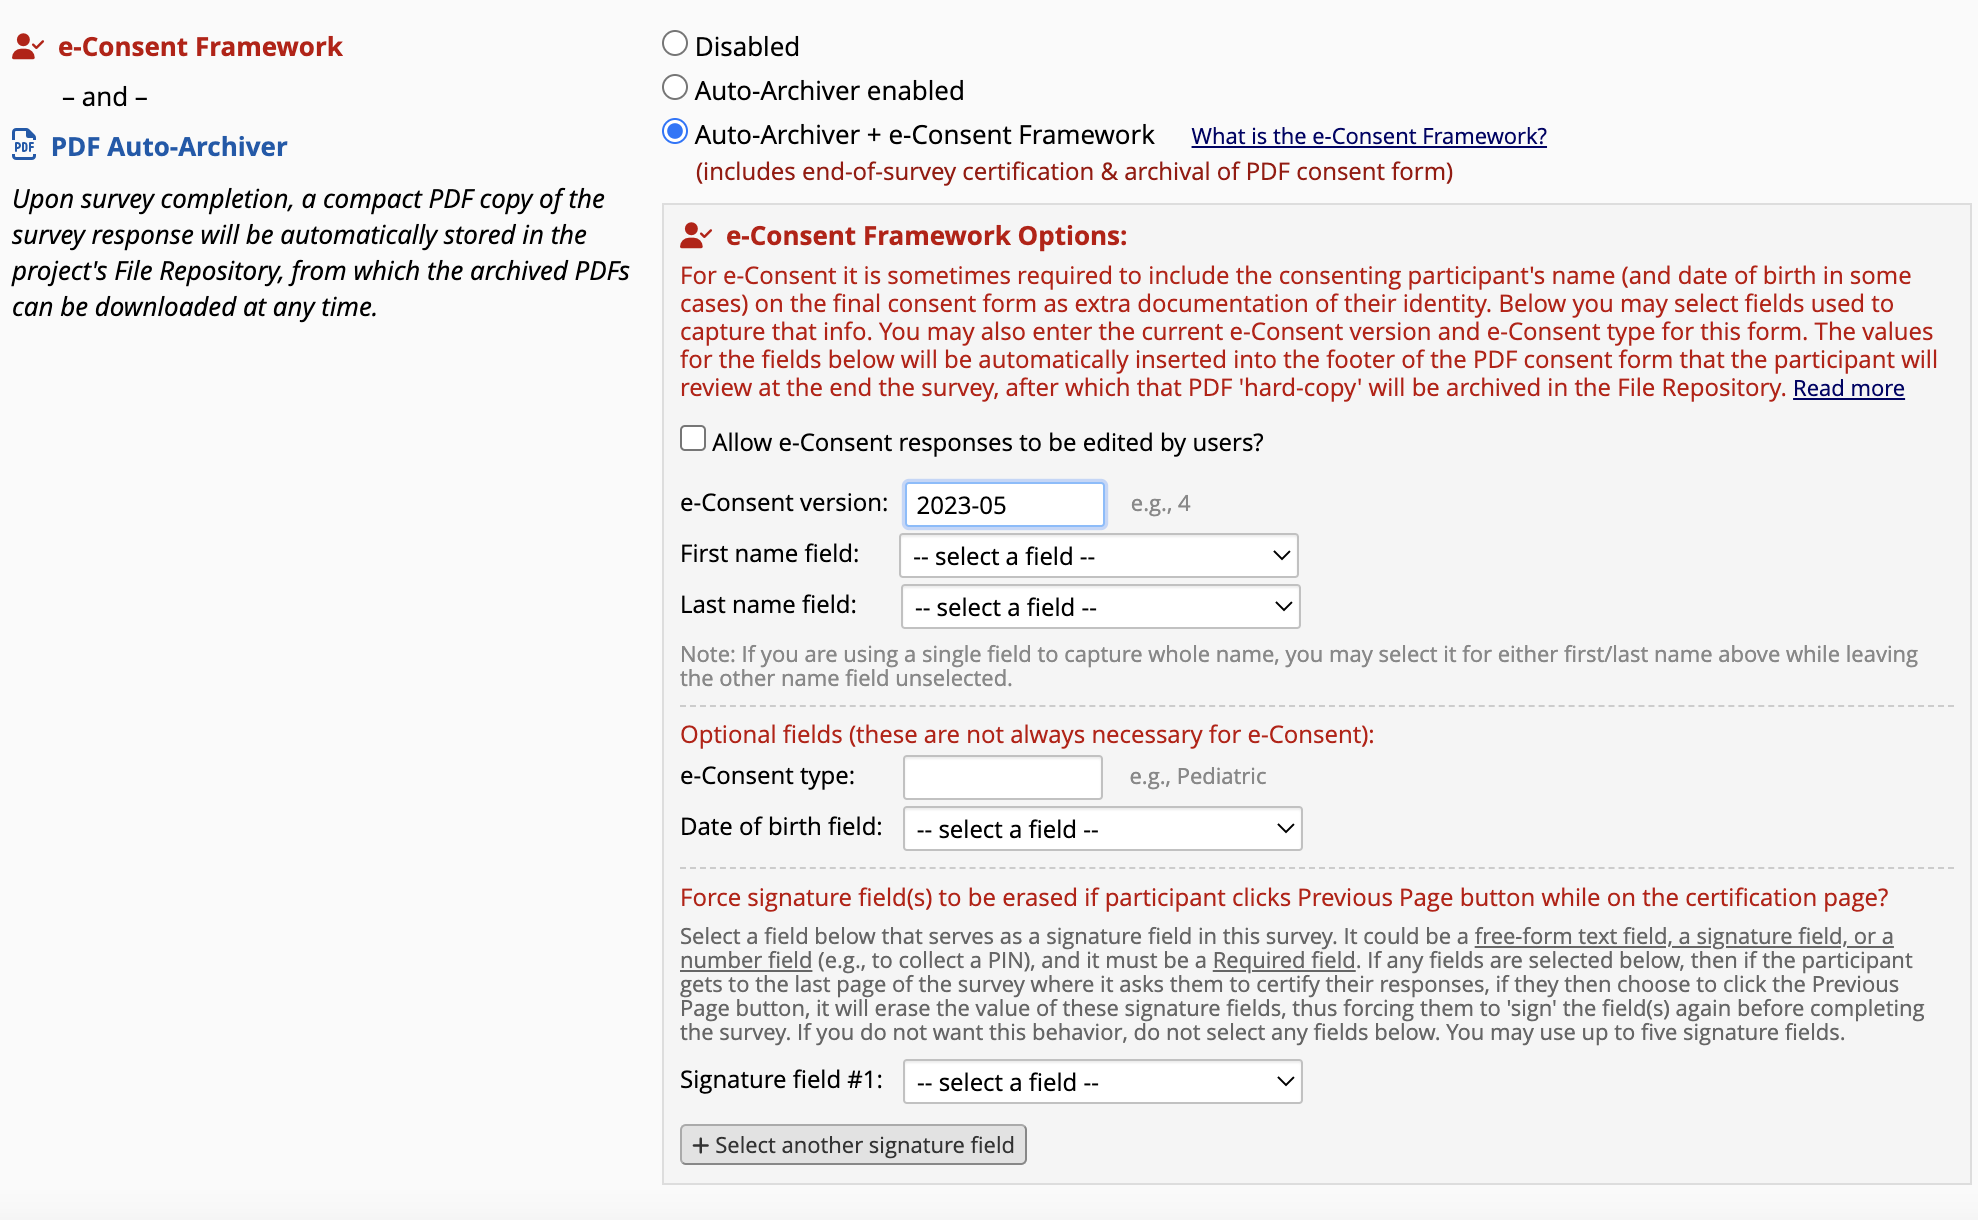
With the Auto-Archiver and e-Consent Framework activated, all your consents will be logged in the File Repository, sorted by record ID.
Additionally, you may want or need to send participants a copy of the consent. You can set this in the Survey Settings for the consent instrument:
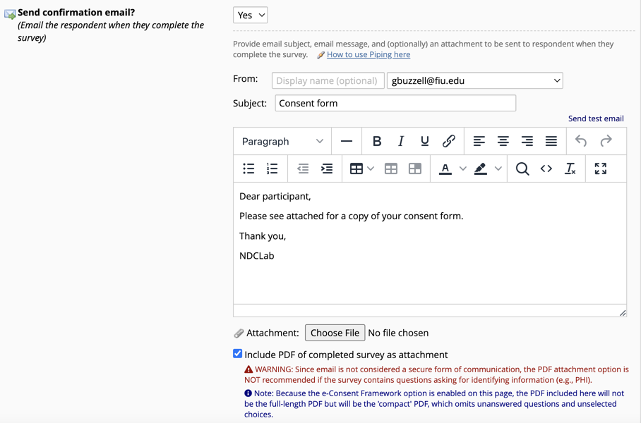
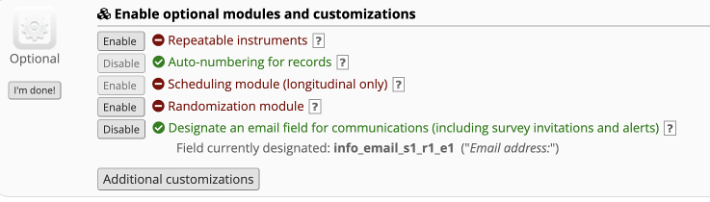
For this to function properly, it it is necessary to tell REDCap which field is the e-mail address for the participant. You do this on Project Setup by enabling the “Designate an email field…” option:
Data Dictionary Maneuvers
Adding the Same Instrument Twice
REDCap has a “Data Dictionary” feature that can be used to modify project details in a safer, more convenient way than manual changes to individual instruments and their questions. A key use case is when you want to use the same instrument twice, for example before two different conditions of a behavioral task. In such a case, you need to have an “e1” version and an “e2” version of the instrument to adhere to the lab’s naming conventions. Below are details on how to use the Data Dictionary feature inside REDCap to create the “e2” version:
- First, upload the “e1” version as you normally would any instrument.
- Confirm that you have no other drafted changes pending in the project.
- Navigate to “Dictionary” from the left-hand navigation pane.
- Download the current Data Dictionary by clicking the hyperlinked text (“Download the current Data Dictionary”).
- Open the CSV file in Excel and select all the rows relating to the instrument requiring modification. Copy them on to your clipboard.
- After the last row of data, paste the copied rows. Be careful not to overwrite any other rows and not to leave any blank rows.
- Select the pasted cells and, under the Home tab, choose “Find & Select”, then “Replace.”
- In the “Find what” box, enter:
_s1_r1_e1. - In the “replace with” box, enter:
_s1_r1_e2. - Click “Replace All.” This replaces the session/run/event information in all instances for the new instrument.
- Re-upload the revised Data Dictionary by following the instructions on REDCap, located on the same page where you clicked the hyperlink to download the CSV.
- Check that your new instrument was created properly.
(Note: you will need to modify the details of the Find/Replace command if your questions use any branching or display logic that extracts variables from a different instrument. The instructions above assume that any branching or display logic within the instrument is self-contained.)
Taking a Snapshot of the Project
You should also use the Data Dictionary export feature to take a snapshot of your project at launch (and at any future date when you roll out changes to the REDCap project). After downloading the CSV, simply add it to your GitHub repo, under materials/questionnaires/ as a record of all questions in the project at the time of launch.
Identifiers
It is imperative that any variable that will contain identifiable data be marked as an “identifier” in the associated REDCap instrument. This includes things like the participant’s name, date of birth, and contact information. If in doubt, mark it! This only affects data exports, and works to ensure the confidentiality of participant information.
Surveys and the Survey Queue
Survey settings allow you to control how questionnaires appear to participants. This includes:
- logo header
- survey title
- instructions at the top of the form
- (optional) message that appears for a participant when they complete and submit the form
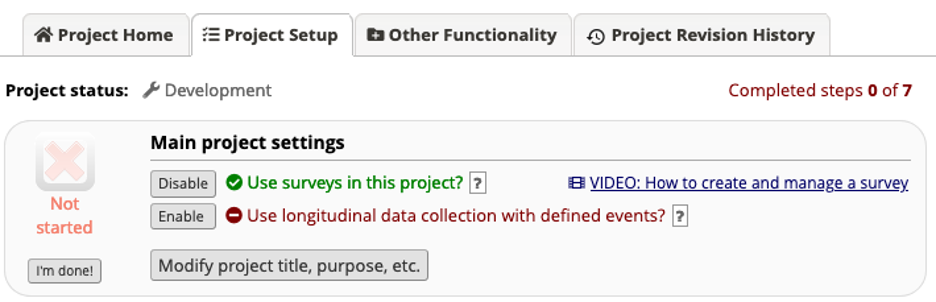
Survey functionality must first be enabled globally on the project in order to enable any individual instrument as a survey. Under Project Setup, in the “Main project settings,” ensure that “Use surveys in this project?” is enabled:
To enable a specific instrument as a survey, navigate to the Designer and click the “Enable” button next to the instrument in question:

To adjust the survey settings for a particular instrument:
- Click the “Survey settings” button.
- Check that the “Survey Title” and “Survey Instructions” match the formal instrument in the lab’s
instrumentsrepository on GitHub. - Upload the NDCLab logo. You can download it here. (Note: you only need to add the logo to one survey, then use the “Copy design to other surveys” button to update all existing surveys in the REDCap project, so you should not bother with this until you have added all instruments to your REDCap project and enabled them all as surveys.)
- Update the “Survey Completion Text” as appropriate for the location of the survey in the list of surveys and activities that a participant will complete for your study. For some surveys, this might be blank, especially if you are using a survey queue (see below).
- Click “Save Changes” at the bottom of the page to save all your changes to the Survey Settings.
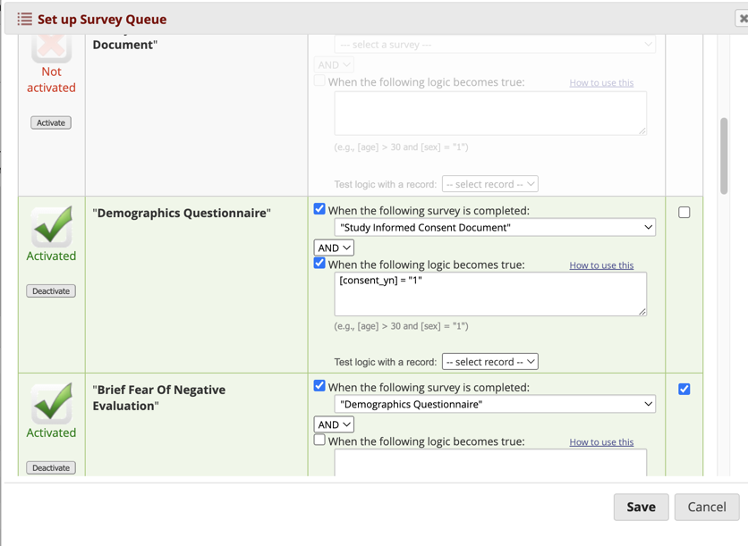
Once you have a set of surveys enabled on your project, you can string them together into a “survey queue,” so that the completion of one questionnaire immediately launches the next questionnaire. You can control which questionnaires automatically start and the conditional logic required for auto-start. To create a survey queue, start by clicking the “Survey Queue” button on the Designer:

If you want a questionnaire to begin automatically when the prior questionnaire is completed, click the “Auto start?” checkbox for that survey and specify the preceding survey to link it to. In some cases, you may want to include conditional logic. In the example below, the Demographics questionnaire only auto-starts in cases where the participant has indicated their consent to proceed with the study:
Alerts and Automated Invitations
Automated Invitations
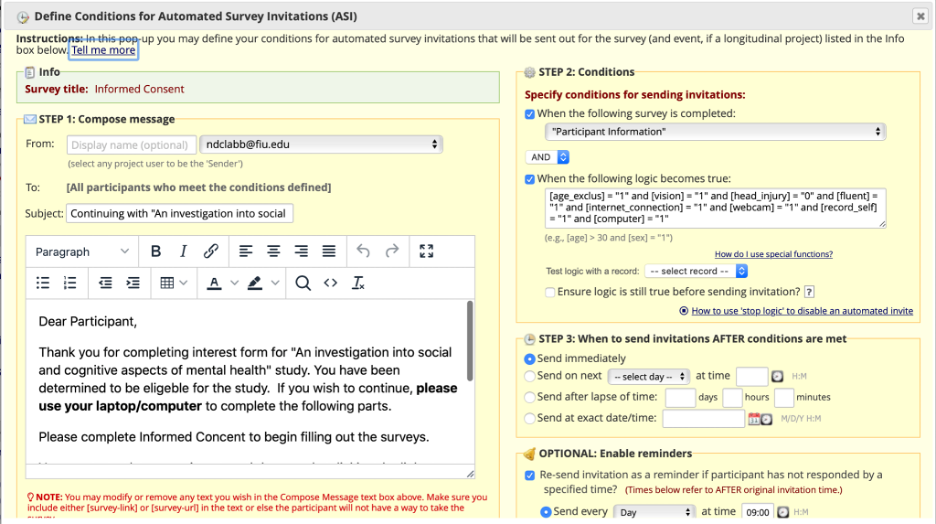
In some cases, for example asynchronous studies, you may want to automatically send a survey (say, an online consent form) in cases where one survey is submitted with certain conditions met (such as an eligibility screener where the prospective participant meets all eligibility criteria). This is accomplished with an “Automated Invitation,” accessible in the Designer:
- Click the “Automated Invitations” button associated with the instrument that you want to send the participant by e-mail after they meet criteria on the prior instrument. (Note that the instrument must be enabled as a survey first.)
- In the new window, you will complete the following:
-
Step 1: Add the display name (optional) and e-mail from which the invitation to the participant will be sent. Include a Subject line and the body of the message. Make sure that the message contains the
[survey-link]and[survey-url]tags. - Step 2: Specify which survey triggers the automated invitation upon completion, and which of its variables must meet which specific criteria.
- Step 3: Indicate whether you want the e-mail with the link to be sent immediately or after some delay. (In general, immediate is preferable for the typical use cases in the lab.)
- Optional Step 4: Enable follow-up reminder e-mails (frequency and how many times a reminder will go out) that the participant will receive if they do not respond.
- Click Save.
-
Step 1: Add the display name (optional) and e-mail from which the invitation to the participant will be sent. Include a Subject line and the body of the message. Make sure that the message contains the
Alerts
For asynchronous studies, there are a number of e-mail alerts that you may want to send, either to participants or to a member of the study team. These include:
- notifying a participant of their ineligibility
- notifying the study lead of the eligibility/ineligibility of each individual who completes the screener
- notifying the study lead when certain milestones are completed in the study (task completed, full study completed, etc.)
To create a new alert:
- Navigate to the “Alerts & Notifications” section.
- Click the green “Add New Alert” button.
- Complete the details:
- Step 1: Specify what logic (variable and value) should trigger the alert.
- Step 2: Specify when the alert should be sent (in general, immediate is preferable).
- Step 3: Specify the message details, including the e-mail sender, subject line, and message body. You can pipe any variable that the participant has completed into the e-mail by using square brackets. (Warning: NEVER pipe any variable that contains identifiable data!)
- Click Save.
- Test that your alert works as you expect!
Even in synchronous studies, alerts can be useful. For example, you can use an alert to:
- send a message to the PI if a participant responds with a particular answers on a particular question (e.g., questions about self-harm)
- send a message to the study coordinator when a participant has completed a session so that they may send compensation to the participant
Production Mode
In Development mode, you can make any changes that you want to the REDCap project. For this reason, you build out a new project in Development mode.
Some types of changes, however, can impact any existing data collected. Therefore, once your project is ready for launch, you will want to move it to Production mode. After moving to Production mode, some kinds of changes are prohibited (e.g., changing a variable name) and others will generate warnings of possible or definite data loss if the change is made. Other changes, such as adding a new variable, are automatically approved even in Production mode.
To move a project into Production mode:
- Select the “Project Setup” tab.
- Scroll to the bottom, and click “Move project to production.”
- Select “Keep ALL data saved so far” and click “Yes, Request Admin to Move to Production Status.”
This routes an e-mail to CCF Data Services who will e-mail you once the project has been transitioned into Production mode.
You should move your REDCap project into Production Mode once it is set up and fully tested. This becomes the official “start” date for data collection. Record this in your study log, and name the REDCap project accordingly: YYYYMMv0_name-of-your-dataset.
Making Changes After Launch
Just like the creation of a new questionnaire, any correction to an existing questionnaire should be performed in the labwide instruments repo, then updated within a specific data collection project. When correcting an error, the new instrument has a letter revision (e.g., erq_b, erq_c, etc.) so that when researchers are analyzing the data, they can cross-check with the precise version of the instrument that a given participant saw. Load the new questionnaire into the REDCap data collection project (so you will have two: the old one and the new one), then modify the survey queue so that future participants only see the new questionnaire. Do not delete or replace the old questionnaire, or you will lose all the data you already collected on it!
Adjusting User Rights
When a new REDCap project is released to the lab, it is important to check which user roles are already available and confirm that they are, by default, limited in how they export data. This is the only method by which variables marked as “Identifier” are excluded from data exports.
- Navigate to the “User Rights” section.
- For each “Role name” click the name.
- On the right-hand side, under “Data Export Rights,” ensure that “Remove All Identifier Fields” is the option selected for all surveys, without exception.
- Make sure to repeat this for all roles in the project.
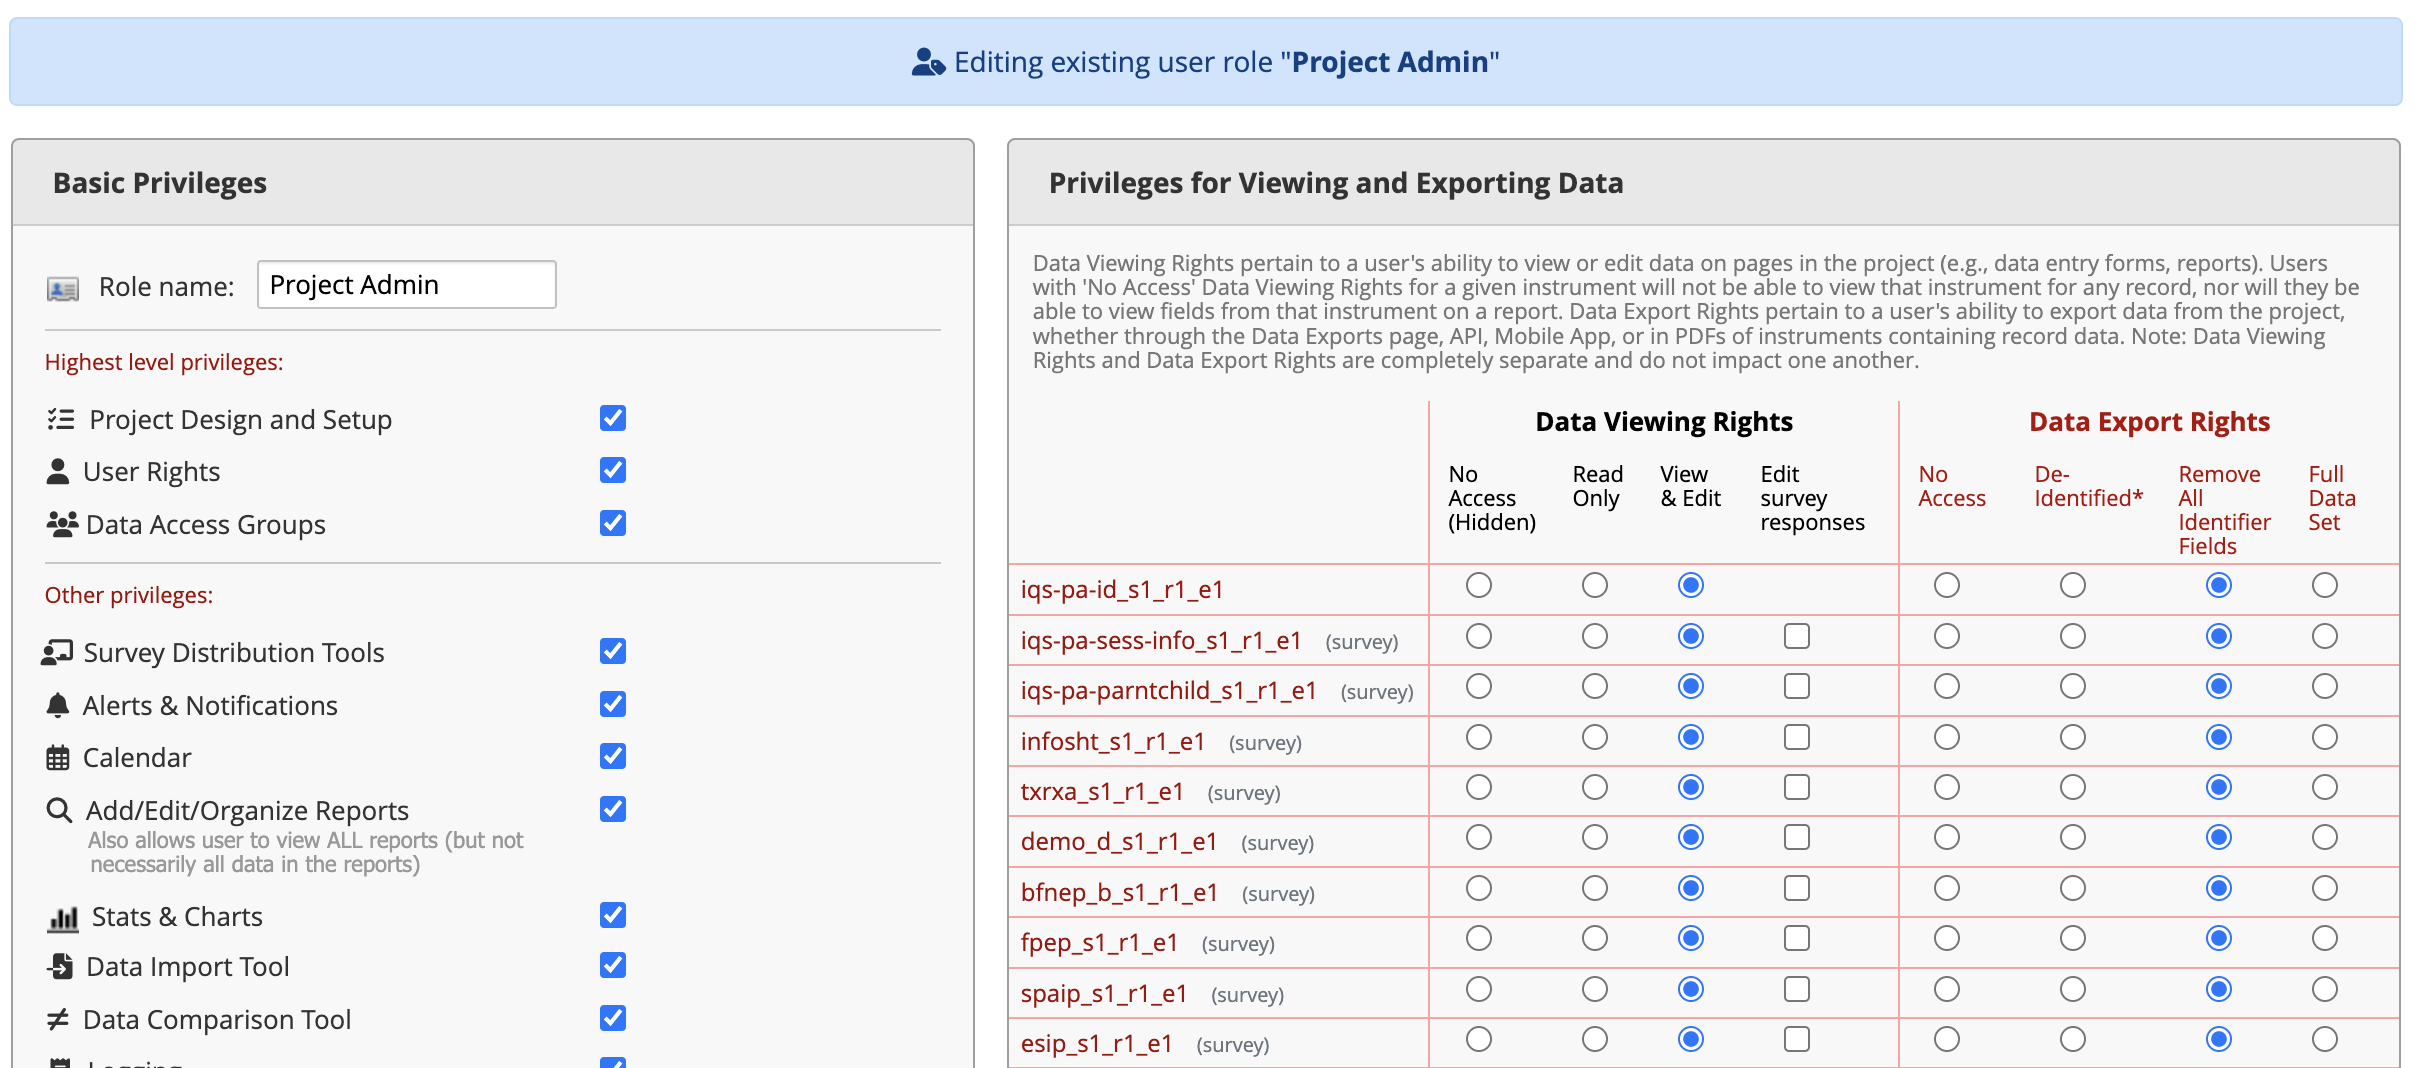
As you can see, you have very granular control of user rights. You can create new user roles and specify permissions. (In all cases, the “Data Export Rights” should match those described above in order to protect the confidentiality of participant information.) Think carefully and critically about how to set up roles in order to reduce the likelihood and impact of any errors by members of the project team.
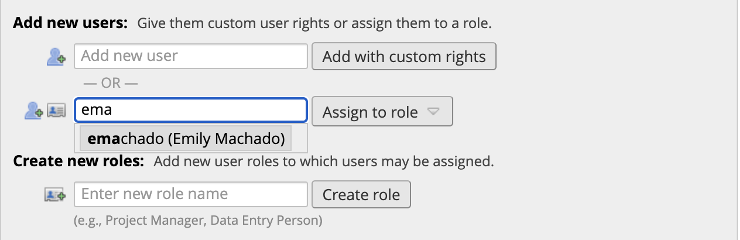
Adding New Users
At any given time, only project members who have already been approved by the FIU IRB may have access to the REDCap project. In order to grant access to a newly-approved team member:
- Navigate to the “User Rights” section.
- Next to the “Assign to role” button, begin typing the AD account (FIU e-mail without numbers) of the user. It will autopopulate from the list of all FIU individuals with REDCap access. Once the username is populated, the “Assign to role” flydown lets you select to which existing role in the project the new user should be assigned.
Connecting to Pavlovia
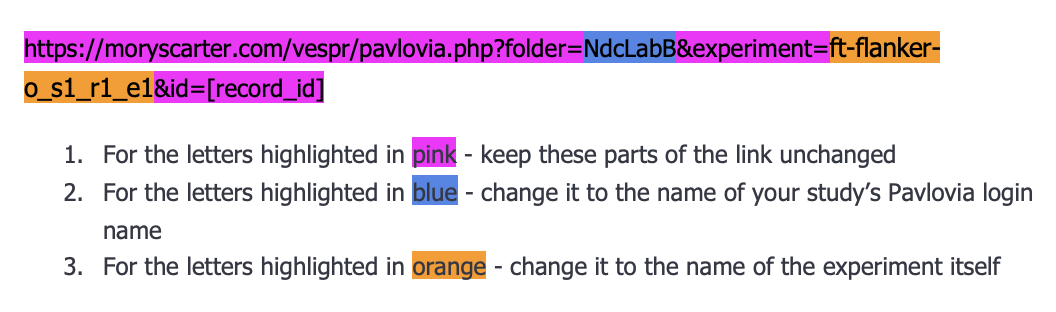
If you will redirect users from a REDCap survey queue to a PsychoPy task running on Pavlovia, you will need to create a special instrument that contains a link to the Pavlovia task. Note that you cannot simply use the main link to the Pavlovia experiment as this would require participants to manually input their own Participant ID (which they do not know). The Vespr tool allows you to pass the REDCap-created Participant ID directly into Pavlovia. Here is an example:
File Repository
If you set up the eConsent Framework + Archiver, completed consents will live in the File Repository. You can also use this space to share information for project team members, such as passwords. To do so, simply upload a blank .txt file, then click the space under “Comments” and add the details desired. These will be visible to any authorized user who is logged into the REDCap project.