Contents
Overview
The lab manager creates a gDrive folder for each new data collection project in the lab.
Notebook
The blank folder for your project will include a notebook. This document should be used to record the various issues that you encounter and the solutions that you find during the study setup and data collection processes. Importantly, it is vital to keep the Study Change Log updated with all significant changes to the study, such as: initial launch, modifications of questionnaires, IRB amendments, change in study personnel, etc.
Study Protocols
The experimental protocol may be drafted in Google Drive so that all project members may access it and easily comment upon it. Access is open to all lab members, but only study team members, senior RAs, and lab staff should have Editor access.
Study Tracker
All tracker templates can be found here.
Although the general templates include most necessary fields, they can be modified to meet the needs of your specific study.
Security
The study tracker should be available to all study team members and lab staff. Access should be removed from all other lab members simply for the sake of security. Once you set up your study tracker, but prior to the start of data collection, inform the lab manager, who will move the physical tracker into a special management area and create a shortcut in your project’s gDrive folder. This makes it possible for the lab manager to easily onboard and offboard lab members to the lab’s Google Drive folder without impacting security of study trackers.
Conditional Formatting
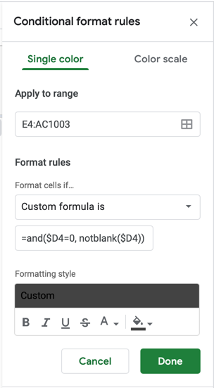
For asynchronous studies in which participant IDs are automatically assigned by REDCap when prospective participants complete the online screener, you will likely find it useful to automatically “grey out” rows associated with participant IDs who do not meet eligibility requirements of the study. To accomplish this, ensure that you have an “Eligible” field that is consistently completed for each participant (0=not eligible, 1=eligible). To apply conditional formatting:
- Select Format tab on top, click on Conditional Formatting
- Click on +Add another rule
- Copy the instructions to the respective fields and press done.
- If the tracker fields have been edited (new column added or old ones deleted) make sure to edit the range of conditional formatting (currently it is on E4:AC1003 and column D represents the eligibility column).
